繁體中文手寫辨識 ![]()
繁體中文,歷史久遠且優美的文字

(Author: Dr. Wu - 彥霖 博士;Editor: Ken;Date of published: 2020/04/30)
本文使用繁體中文手寫資料集、小畫家自製手寫資料,利用卷積神經網路進行文字識別。
本文將帶讀者深入瞭解如何使用繁體中文手寫資料集,透過 Colab 實作範例程式碼,從下載到資料部署,認識如何構建自己的資料集,最後使用卷積神經網路進行文字辨識;正式的 Github 專案:中文手寫辨識提供讀者們本機端的操作範例及 Colab 上實作範例,歡迎讀者們透過實作演練,深入認識繁體中文手寫辨識專案。
Github 專案
Step 0: 匯入套件
導入實作中所需套件,請確認 Python, Tensorflow, Keras 版本。
from platform import python_version
import os
import shutil
import numpy as np
import pandas as pd
import PIL.Image
from matplotlib import pyplot as plt
from matplotlib.font_manager import findfont, FontProperties
'''
繁體中文顯示設定
'''
from matplotlib.font_manager import FontProperties
default_type = findfont( FontProperties( family=FontProperties().get_family() ) )
ttf_path = '/'.join( default_type.split('/')[:-1] ) # 預設字型的資料夾路徑
os.chdir( '/content' )
if not os.path.exists( '/content/matplotlib_Display_Chinese_in_Colab' ):
!git clone https://github.com/YenLinWu/matplotlib_Display_Chinese_in_Colab
os.chdir( '/content/matplotlib_Display_Chinese_in_Colab' )
for item in os.listdir():
if item.endswith( '.ttf' ):
msj_ttf_path = os.path.abspath( item )
msj_name = msj_ttf_path.split('/')[-1]
try:
shutil.move( msj_ttf_path, ttf_path )
except:
pass
finally:
os.chdir( '/content' )
shutil.rmtree( '/content/matplotlib_Display_Chinese_in_Colab' )
font = FontProperties( fname=ttf_path+'/'+msj_name )
import tensorflow as tf
from tensorflow.keras.preprocessing.image import load_img, ImageDataGenerator
from tensorflow.keras.models import Sequential, load_model
from tensorflow.keras.layers import Conv2D, MaxPooling2D, Flatten, Dense, Dropout
from tensorflow.keras.optimizers import *
print( 'Python Version: ', python_version() )
print( 'TensorFlow Version: ', tf.__version__ )
print( 'Keras Version: ', tf.keras.__version__ )
實作範例版本如下:
Step 1: 使用 Data Deployment 教學範例,部署繁體中文手寫資料集
!git clone https://github.com/AI-FREE-Team/Traditional-Chinese-Handwriting-Dataset.git
import shutil
OutputFolder = '/content/Handwritten_Data'
if not os.path.exists(OutputFolder):
os.mkdir(OutputFolder)
print( f'Create the new "{OutputFolder}" folder' )
os.chdir(OutputFolder)
### 檢查路徑
!pwd
CompressedFiles = []
os.chdir('/content/Traditional-Chinese-Handwriting-Dataset/data')
for item in os.listdir():
if item.endswith('.zip'): # Check for ".zip" extension.
file_path = os.path.abspath(item) # Get full path of the compressed file.
CompressedFiles.append(file_path)
for file in CompressedFiles:
# Construct a ZipFile object with the filename, and then extract it.
zip_ref = zipfile.ZipFile(file).extractall(OutputFolder)
source_path = OutputFolder + '/cleaned_data(50_50)'
img_list = os.listdir(source_path)
for img in img_list:
shutil.move(source_path + '/' + img, OutputFolder) # Move a file to another location.
shutil.rmtree(OutputFolder + '/cleaned_data(50_50)')
print(f'Decompress successfully {file} ......')
print( 'Moving images according to traditional Chinese characters......' )
ImageList = os.listdir(OutputFolder)
ImageList = [img for img in ImageList if len(img)>1]
WordList = list(set([w.split('_')[0] for w in ImageList]))
for w in WordList:
try:
os.chdir(OutputFolder) # Change the current working directory to OutputPath.
os.mkdir(w) # Create the new word folder in OutputPath.
MoveList = [img for img in ImageList if w in img]
except:
os.chdir(OutputFolder)
MoveList = [ img for img in ImageList if w in img ]
finally:
for img in MoveList:
old_path = OutputFolder + '/' + img
new_path = OutputFolder + '/' + w + '/' + img
shutil.move( old_path, new_path )
print( 'Data Deployment completed.' )
執行下方程式碼,確認資料集正確無誤:
a=0
b=0
for item in os.listdir(OutputFolder):
a += 1
for i in os.listdir(OutputFolder + '/' + item):
b +=1
print('總共: ' + str(a) + ' 個字(資料夾) / 總共: ' + str(b) + '個樣本')
print('平均每個字有: ' + str(b/a) + ' 個樣本')
預期執行結果:

Step 2: 訓練集與自製測試集路徑
colab 上路徑建立:
os.chdir('/content')
os.mkdir('Traditional_Chinese_Testing_Data')
os.chdir('/content/Traditional_Chinese_Testing_Data')
下載示範資料集 (此步驟可參考範例資料集後,依需求作修改)
!git clone https://github.com/AI-FREE-Team/Handwriting-Chinese-Characters-Recognition
自製繁中手寫測試集範例 :
利用小畫家自製繁體中文字,
底圖大小: 50x50 像素
白底黑字
像素筆線條粗細: 1 像素
圖片以 png 格式儲存,存放於以該字為名的資料夾中,如下圖所示: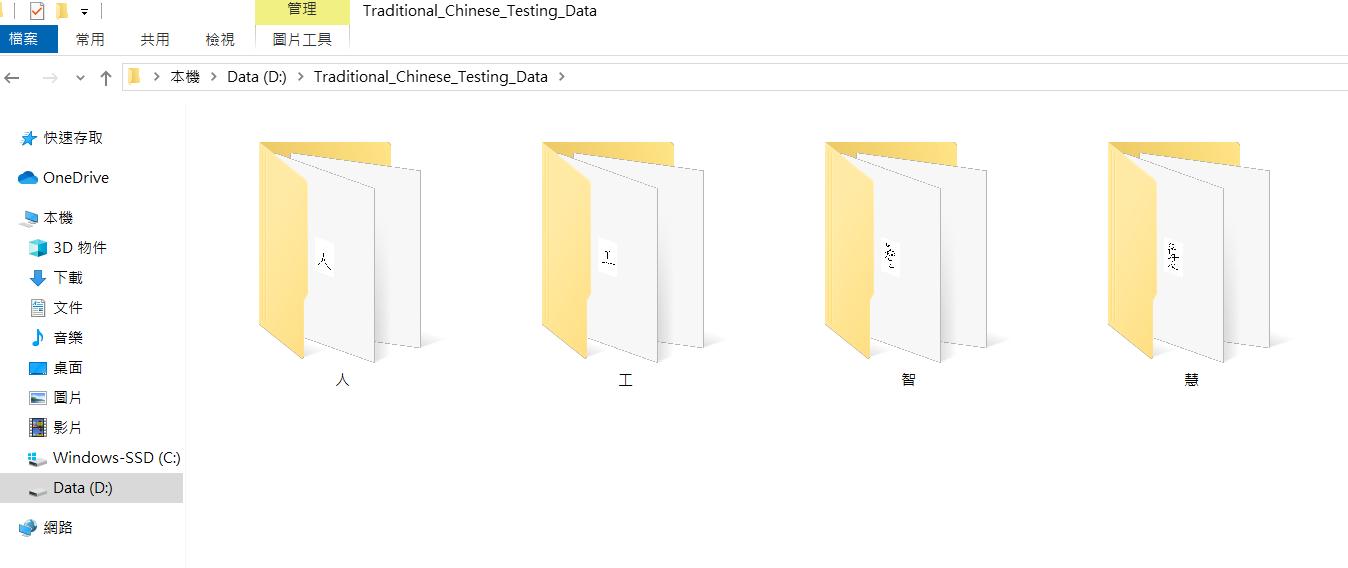
設定路徑位置 (可依據現況修改路徑位置)
'''
RawDataPath: 繁中手寫資料集路徑
TraningDataPath: 訓練集路徑
TestingDataPath: 自製繁中手寫資料集路徑
'''
RawDataPath = '/content/Handwritten_Data'
TraningDataPath = '/content/Traditional_Chinese_Testing_Data/Handwriting-Chinese-Characters-Recognition/train data'
TestingDataPath = '/content/Traditional_Chinese_Testing_Data/Handwriting-Chinese-Characters-Recognition/test data'
os.chdir( RawDataPath )
print( 'Current working directory:', os.getcwd() )
Step 3: 訓練集製作
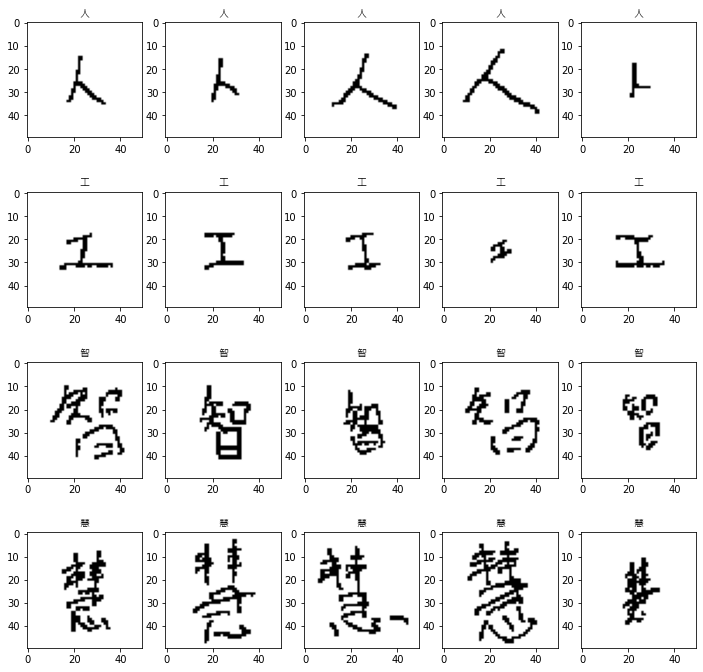
從繁體中文手寫資料集中,選擇欲辨識的中文字作為訓練集。
SelectedWords = [ '人', '工', '智', '慧' ]
os.chdir( RawDataPath )
try:
os.mkdir( TraningDataPath )
except:
shutil.rmtree( TraningDataPath )
os.mkdir( TraningDataPath )
finally:
nonexistence = []
for c in SelectedWords:
try:
shutil.copytree( RawDataPath+'/'+c, TraningDataPath+'/'+c )
except:
nonexistence.append( c )
if len(nonexistence)>1:
print( f'There are {len(nonexistence)} characters that are not in dataset. \n{nonexistence}' )
elif len(nonexistence)==1:
print( f'There is {len(nonexistence)} character that is not in dataset. \n{nonexistence}' )
else: print('')
def Loading_Image( image_path ):
img = load_img( image_path )
img = tf.constant( np.array(img) )
return img
def Show( image, title=None ) :
if len( image.shape )>3 :
image = tf.squeeze( image, axis=0 )
plt.imshow( image )
if title:
plt.title( title, fontproperties=font)
img_list = []
for c in SelectedWords :
folder_path = TraningDataPath+'/'+c
file_names = os.listdir( folder_path )
for i in range(5) :
img_list.append( folder_path+'/'+file_names[i] )
plt.gcf().set_size_inches( (12,12) )
for i in range(20):
plt.subplot(4,5,i+1)
title = img_list[i].split('/')[-1].split('_')[-2]
img = Loading_Image( img_list[i] )
Show( img, title )
預期 output:
Step 4: 參數設定
Num_Classes = len(SelectedWords)
Image_Size = ( 50, 50 )
Epochs = 50
Batch_Size = 8
Step 5: 資料擴增( Data Augmentation )
(5.1) 訓練集設定
Train_Data_Genetor = ImageDataGenerator( rescale = 1./255, validation_split = 0.2,
width_shift_range = 0.05,
height_shift_range = 0.05,
zoom_range = 0.1,
horizontal_flip = False )
Train_Generator = Train_Data_Genetor.flow_from_directory( TraningDataPath ,
target_size = Image_Size,
batch_size = Batch_Size,
class_mode = 'categorical',
shuffle = True,
subset = 'training' )
def Plot_Genetor( imgs, labels=[], grid=(1,10), size=(20,2) ):
n = len( imgs )
plt.gcf().set_size_inches(size)
for i in range(n):
ax = plt.subplot( grid[0], grid[1], i+1 )
ax.imshow( imgs[i] )
if len(labels):
ax.set_title( f'Label={labels[i]}' )
ax.set_xticks([]); ax.set_yticks([])
plt.show()
batch = 1
for data, label in Train_Generator:
print( f'batch {batch}: \n shape of images: {data.shape} \n shape of labels: {label.shape}' )
Plot_Genetor( data, label )
batch += 1
if batch > len(Train_Generator):
break
print( f'There are {len(Train_Generator)} batches.' )
(5.2) 驗證集
Val_Data_Genetor = ImageDataGenerator( rescale=1./255, validation_split = 0.2 )
Val_Generator = Train_Data_Genetor.flow_from_directory( TraningDataPath ,
target_size = Image_Size,
batch_size = Batch_Size,
class_mode = 'categorical',
shuffle = True,
subset = 'validation' )
Step 6: 建立及編譯模型
CNN = Sequential( name = 'CNN_Model' )
CNN.add( Conv2D( 5, kernel_size = (2,2), padding = 'same',
input_shape = (Image_Size[0],Image_Size[1],3), name = 'Convolution' ) )
CNN.add( MaxPooling2D( pool_size = (2,2), name = 'Pooling' ) )
CNN.add( Flatten( name = 'Flatten' ) )
CNN.add( Dropout( 0.5, name = 'Dropout_1' ) )
CNN.add( Dense( 512, activation = 'relu', name = 'Dense' ) )
CNN.add( Dropout( 0.5, name = 'Dropout_2' ) )
CNN.add( Dense( Num_Classes, activation = 'softmax', name = 'Softmax' ) )
CNN.summary()
CNN.compile( optimizer = Adam(),
loss = 'categorical_crossentropy',
metrics = ['accuracy'] )
Step 7: 訓練及儲存模型
History = CNN.fit( Train_Generator,
steps_per_epoch = Train_Generator.samples//Batch_Size,
validation_data = Val_Generator,
validation_steps = Val_Generator.samples//Batch_Size,
epochs = Epochs )
Train_Accuracy = History.history['accuracy']
Val_Accuracy = History.history['val_accuracy']
Train_Loss = History.history['loss']
Val_Loss = History.history['val_loss']
epochs_range = range(Epochs)
plt.figure( figsize=(14,4) )
plt.subplot( 1,2,1 )
plt.plot( range( len(Train_Accuracy) ), Train_Accuracy, label='Train' )
plt.plot( range( len(Val_Accuracy) ), Val_Accuracy, label='Validation' )
plt.legend( loc='lower right' )
plt.title( 'Accuracy' )
plt.subplot( 1,2,2 )
plt.plot( range( len(Train_Loss) ), Train_Loss, label='Train' )
plt.plot( range( len(Val_Loss) ), Val_Loss, label='Validation' )
plt.legend( loc='upper right' )
plt.title( 'Loss')
plt.show()
儲存模型
os.chdir( '/content' )
CNN.save( 'CNN_Model.h5' )
Step 8: 自製繁中手寫測試集預測
(8.1) 建立自製測試集的生成器( Generator )及走訪器( Iterator )
Test_Data_Genetor = ImageDataGenerator( rescale=1./255 )
Test_Generator = Test_Data_Genetor.flow_from_directory( TestingDataPath,
target_size = Image_Size,
shuffle = False,
class_mode = 'categorical' )
batch = 1
for data, label in Test_Generator:
print( f'batch {batch}: \n shape of images: {data.shape} \n shape of labels: {label.shape}' )
Plot_Genetor( data, label )
batch += 1
if batch > 1:
break
(8.2) 載入模型且預測
Test_Generator.reset()
Predicts=CNN.predict(Test_Generator,verbose=1, steps =8)
(8.3) 檢視預測結果
test_data, test_label = Test_Generator.next()
def Plot_Predict( img, labels=[], predicts=[], size=(20,2) ):
plt.gcf().set_size_inches(size)
ax = plt.subplot( )
ax.imshow( img )
ax.set_title( f'Predict={predicts.round(1)} \nLabel={labels}' )
ax.set_xticks([]); ax.set_yticks([])
plt.show()
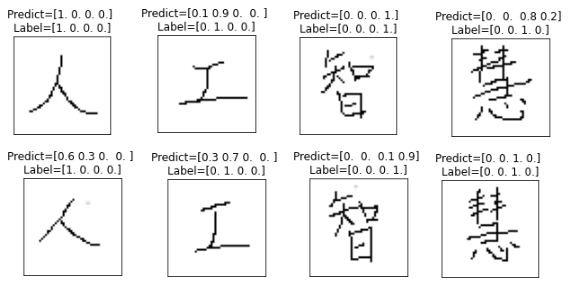
for data, label, predict_label in zip(test_data, test_label, Predicts):
Plot_Predict( data, label, predict_label )
預測結果:
(※ P.S. "智"的label 為第四個;"慧"的label為第三個)
總結
透過繁體中文手寫資料集,能夠有效透過卷積神經網路進行手寫字體辨識。
貼心實作範例:![]()
若對 Detail 實作教學感興趣的讀者,請持續關注 AI . FREE Team 部落格,如有進一步問題或是交流需求,歡迎透過粉專 or email 聯絡我們喔!(AI.Free.Team@gmail.com)
相關資訊:
認識自由團隊:https://goo.gl/D2in5A
加入學習社群:https://goo.gl/k98CBy
企業合作專區:https://goo.gl/osGHhK
自由學習平台:https://goo.gl/ALVKKF
【AI.Free Team 介紹影片】
【Python Basics 自學影片】
資料來源
本數據集由 AI . FREE Team 改作開發自 [STUST EECS_Chinese MNIST(總集)]。如有使用、改作、分享,請註明出處及此訊息。
The dataset is AI . FREE Team development from [STUST EECS_Chinese MNIST(總集)]. If used, modified, or shared, please cite the source and the mesage.
(source: https://github.com/AI-FREE-Team/Traditional-Chinese-Handwriting-Dataset )